
Have you noticed that some emails from your favorite domain are ending up in your Junk box lately? The spam filter in Apple’s Mail app is effective at catching junk mail, while still allowing mail from known senders to reach your inbox. However, this only applies to individual senders and those in your Contacts; it does not automatically allow mail through from an entire domain, such as all email addressed that ends in “whatever.com”.
You can set the Mac Mail app to “whitelist” a domain so that it allows through mail from all addresses from that specified domain. To do so, you need to set up a rule in the Mail preferences.
Steps for Whitelisting a Domain
To whitelist all email from a specific domain in the Mail app in Mac OS X or macOS:
- In the Mac OS X Mail top menu, click Mail > Preferences.
- Click the Rules tab.
- Click Add Rule.
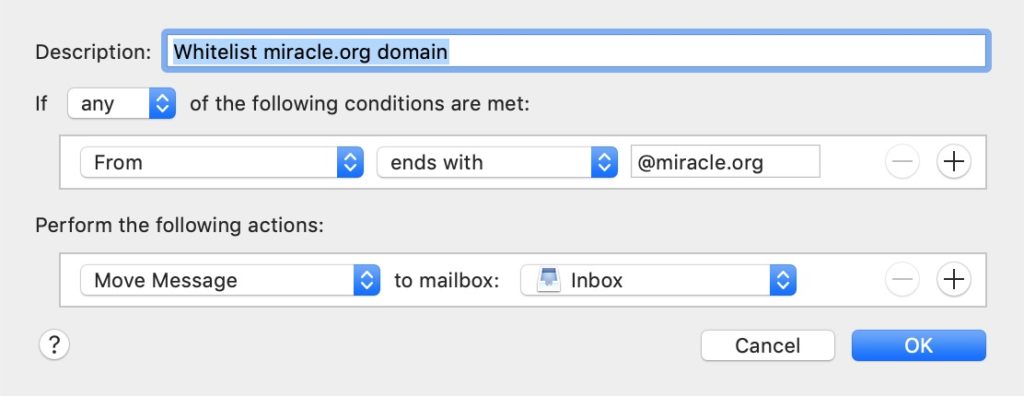
- Type a name in the Description field, such as “Whitelist: example.com,” to identify the new rule.
- For the conditions, set the first dropdown menu item to any, so that it reads: If any of the following conditions are met.
- In the next two dropdown menus, select From in the first, and Ends with for the second.
- In the text field following Ends with, enter the domain’s name that you want to whitelist. Include the ampersand “@” before the domain name to make the filter specific — for example, to whitelist all mail from the whatever.com domain, but not mail that might come from one of its subdomains (such as @subdomain.whatever.com), type “@whatever.com” into the field.
- Click the plus sign next to the last condition to add another domain with the same criteria if you want to whitelist more domains.
- In the Perform the following actions section set the three dropdown items to:Move Message, to the mailbox: Inbox (orspecify a different target folder of your choosing).
- Click OK to save the rule.
- Close the Rules window.
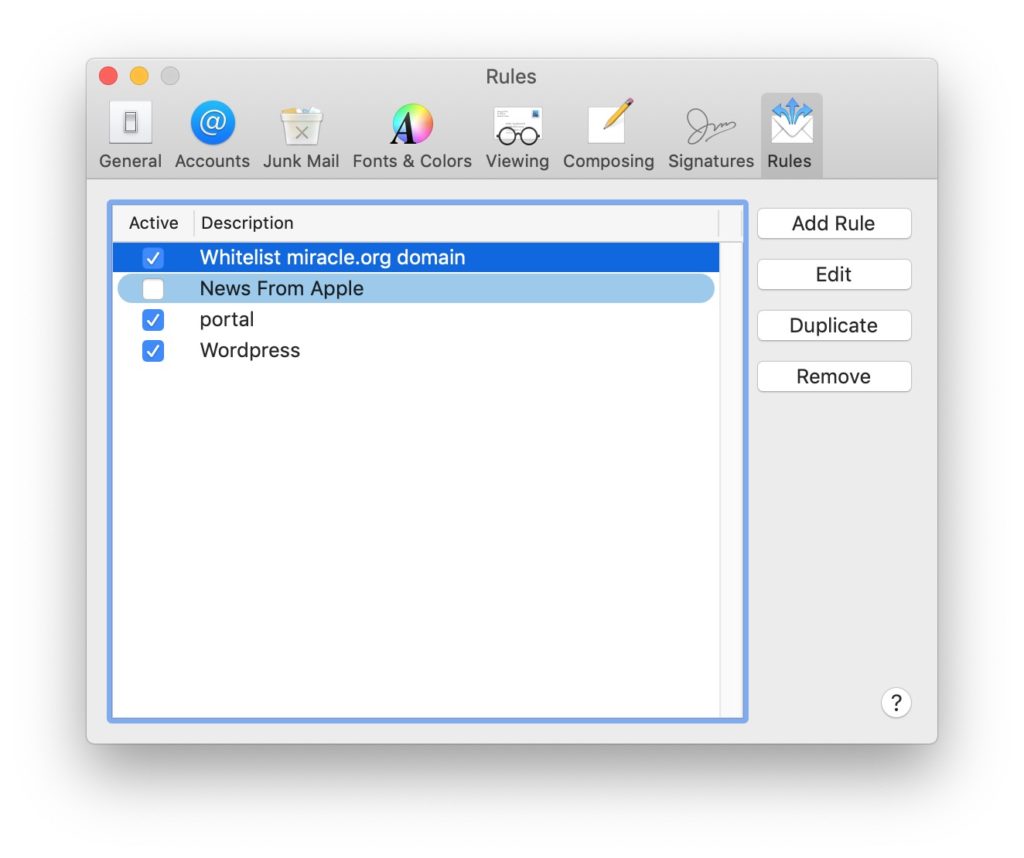
Setting Rule Order in Mac Mail App
The order of the rules you have set matters and Mail executes them one after the other, moving down the list. To ensure that the rule you’ve just created that whitelists a domain is executed before others that might also apply the same message, click and drag that rule to the top of the rules list.
When finished, your windows should look something like this:
Junk Mail Filtering Settings in Mac Mail
Junk mail filtering is active by default in the Mail app. You can find these settings by following these steps:
- In the Mac OS X Mail top menu, click Mail > Preferences.
- Click the Junk Mail tab.
You can customize your junk mail filtering settings, including specifying where junk mail should go and defining exemptions for junk mail filtering. You can also reset the existing Junk filtering rules by clicking the “Reset…” button.
What if the emails are still not in my Junk folder or Inbox?
Your email provider filters out spam in the cloud, long before you check your email using Apple Mail. For instance, if you use Gmail or a Google account, you may need to train your account that emails from your favorite domain are not Spam. Google tech support has an article that describes how to do just that.
Can’t I just have someone do this for me?
Yes, we would be happy to help. Contact Us and we can get you going!
(Excerpted from an article at Lifewire.)