
(This article contains a lot of suggestions and things you can implement on your current iPhone, which can feel overwhelming. I suggest you try one or two things at a time and get comfortable before moving on.)
Older users of iPhones may require more accommodation than younger users. They usually know what they want, but they’re more likely to have physical limitations (like low vision or arthritis in the hands), their level of technical experience can vary more widely, and they need good reasons to learn new things. What works for one person may be inappropriate for another.
First, let’s talk about which model(s) might be best for seniors.
The Best iPhone for Senior Citizens
Because we all rely on familiar patterns—essentially muscle memory—the “best” iPhone will usually be the one that’s the most like the previous one. For many, that would be a third-generation iPhone SE, which has the added benefit of being Apple’s least expensive model. If you have already grown accustomed to Face ID, it’s best to stick with one of those models. Keep in mind that Apple sells previous-generation iPhones—new and refurbished—which can help the pocketbook, too, with little to no loss of core features.
There’s a big difference between a 4.7-inch screen and a 6.1-inch screen. On all iPhones, you can jack up the font size to where you could read it easily. Though I consider the Plus and Pro Max models ludicrously large, their 6.7-inch screens could be even better than the 6.1-inch screen for someone with low vision. Settings to explore include:
- Settings > Display & Text Size > Text Size lets you boost text size in apps that support Dynamic Text.
- Settings > Display & Text Size > Bold Text makes all the text on the iPhone darker.
- Settings > Display & Text Size > Display Zoom > Larger Text bumps up the text size on the Lock Screen and Home Screen, and it makes Home Screen icons larger.
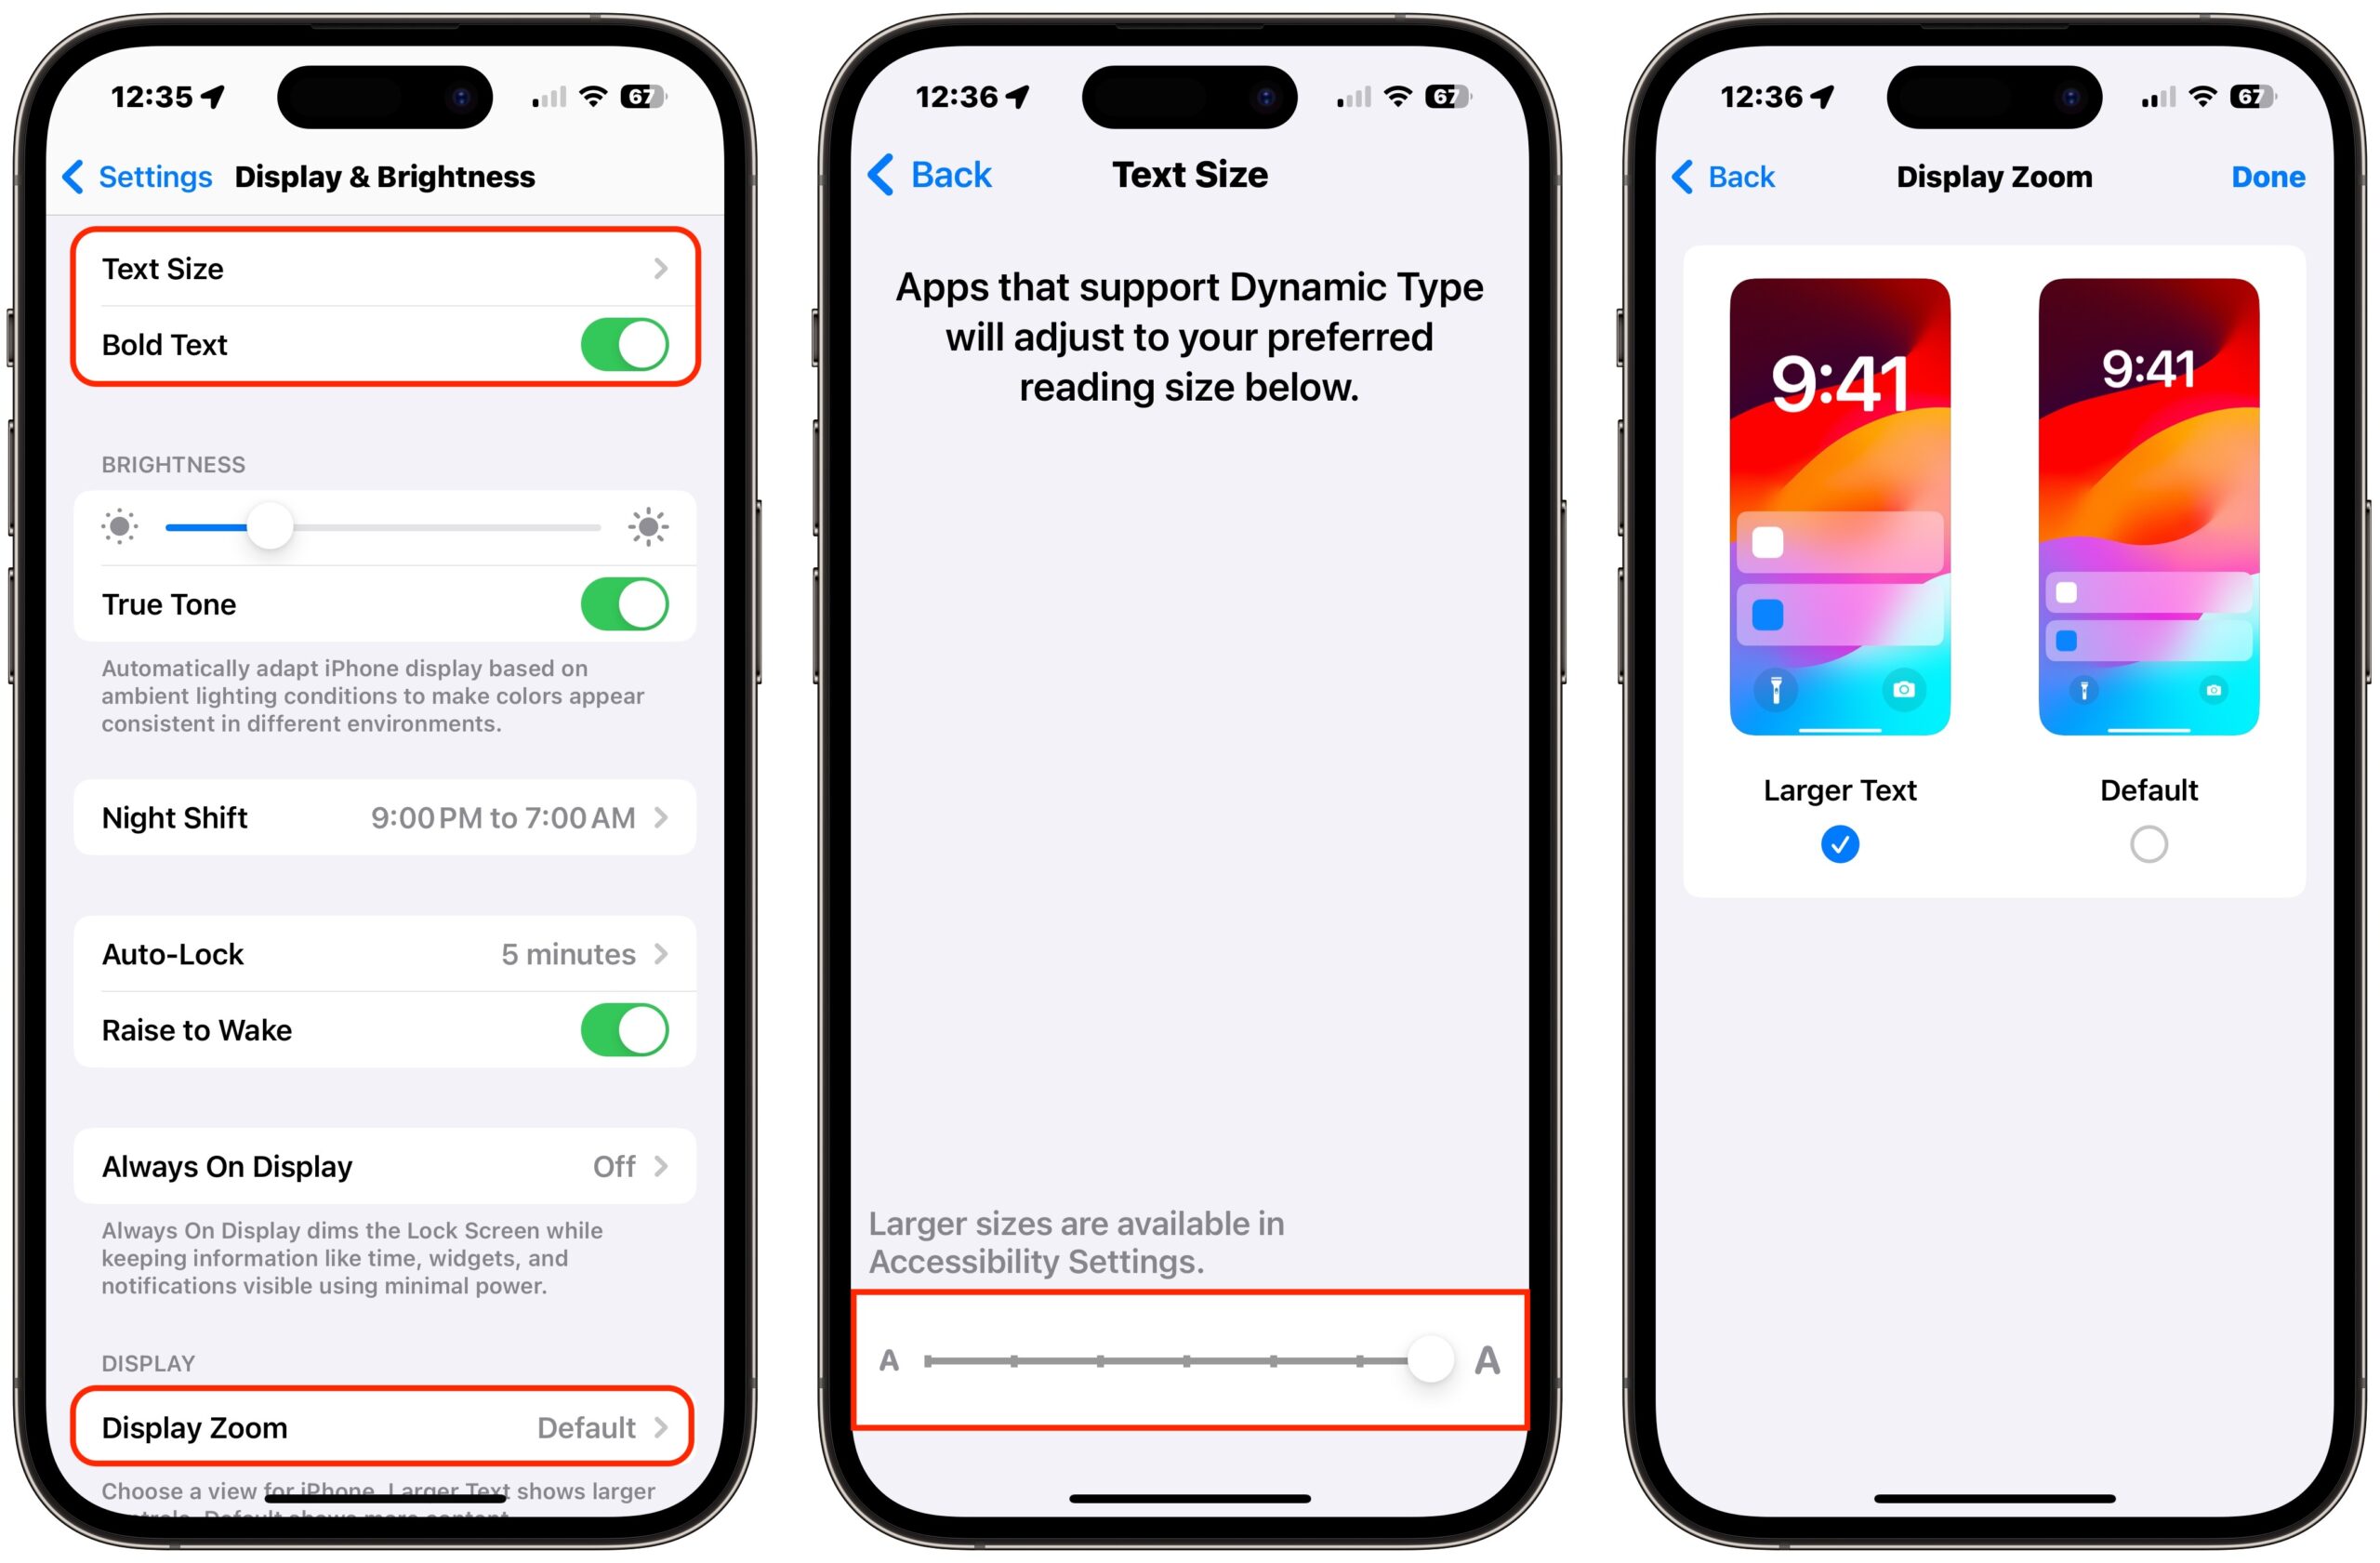
- Settings > Accessibility > Display & Text Size > Larger Text provides a switch for Larger Accessibility Sizes that give you even larger options for the Text Size slider.
- Settings > Accessibility > Display & Text Size has other useful options; consider enabling:
- Button Shapes, which can make it easier to determine when text is a button instead of a descriptive label
- On/Off Labels, which can make it a little more clear when a switch is on or off
- Reduce Transparency, which eliminates visual bleedthrough of background interface elements
- Increase Contrast, which is helpful for those with reduced visual contrast sensitivity, which can stem from cataracts or other eye conditions and makes everything they see soft at the edges

- Settings > Accessibility > Zoom can be helpful for those who need portions of the screen zoomed, but it’s hard to use and can be confusing, so reserve it for those highly incentivized to learn it.
How Best to Simplify an iPhone
As the iPhone and iOS have become more capable, Apple has had to bulk up interface options. For many of us, that’s good—no one may use everything Apple provides, but everyone can pick and choose. However, those who find the options too much to deal with or end up in unexpected modes because of inadvertent swipes, might do better with a more straightforward interface.
Here are some suggestions of how to simplify the iPhone experience:
- Add websites to the Home Screen.
- Move unused apps to the App Library or delete them outright.
- Arrange the most-used apps on the first Home Screen and Dock.
- Turn off all unnecessary notifications.
- Simplify access to frequently used chats, email recipients, and the like.
- Use dictation or, if available, a Mac or iPad with a keyboard for text-intensive tasks.
Add Websites to the Home Screen
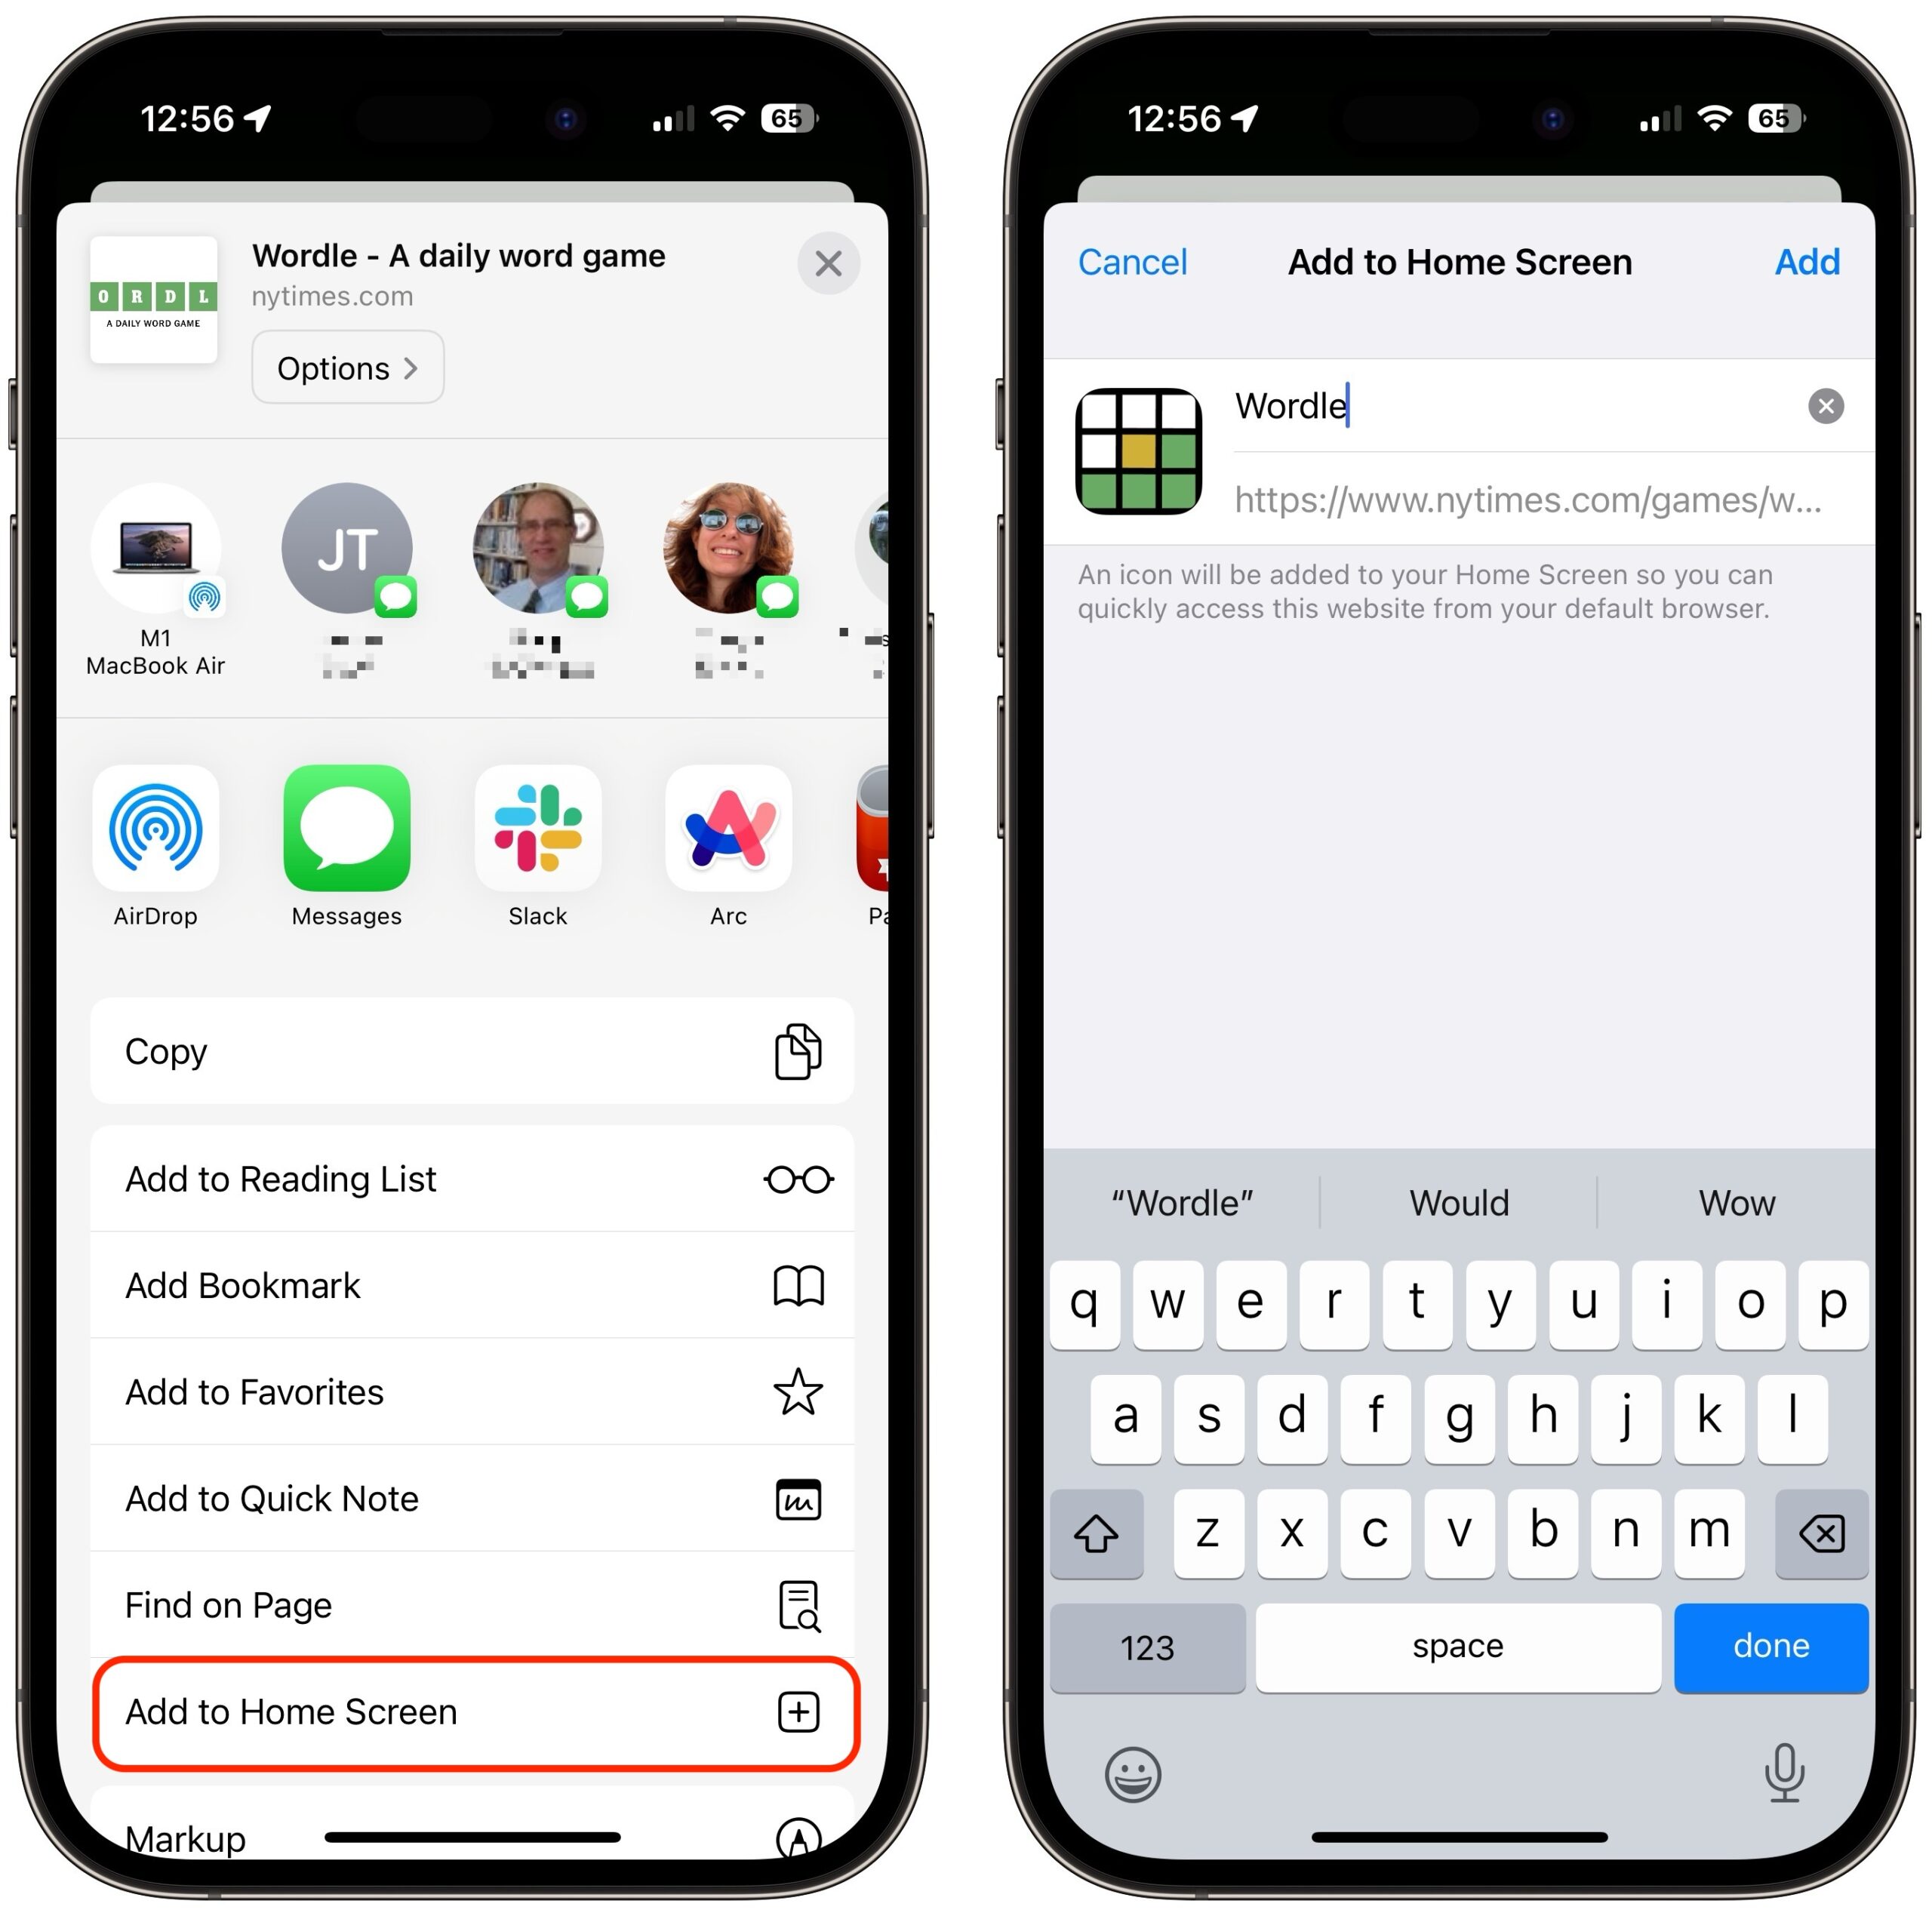
Making any website more accessible is simple: add it to the Home Screen. To do that, navigate to the desired page in Safari, tap the share icon, and tap Add to Home Screen. On the next screen, give the Home Screen icon a name (keep it short) and tap Add.
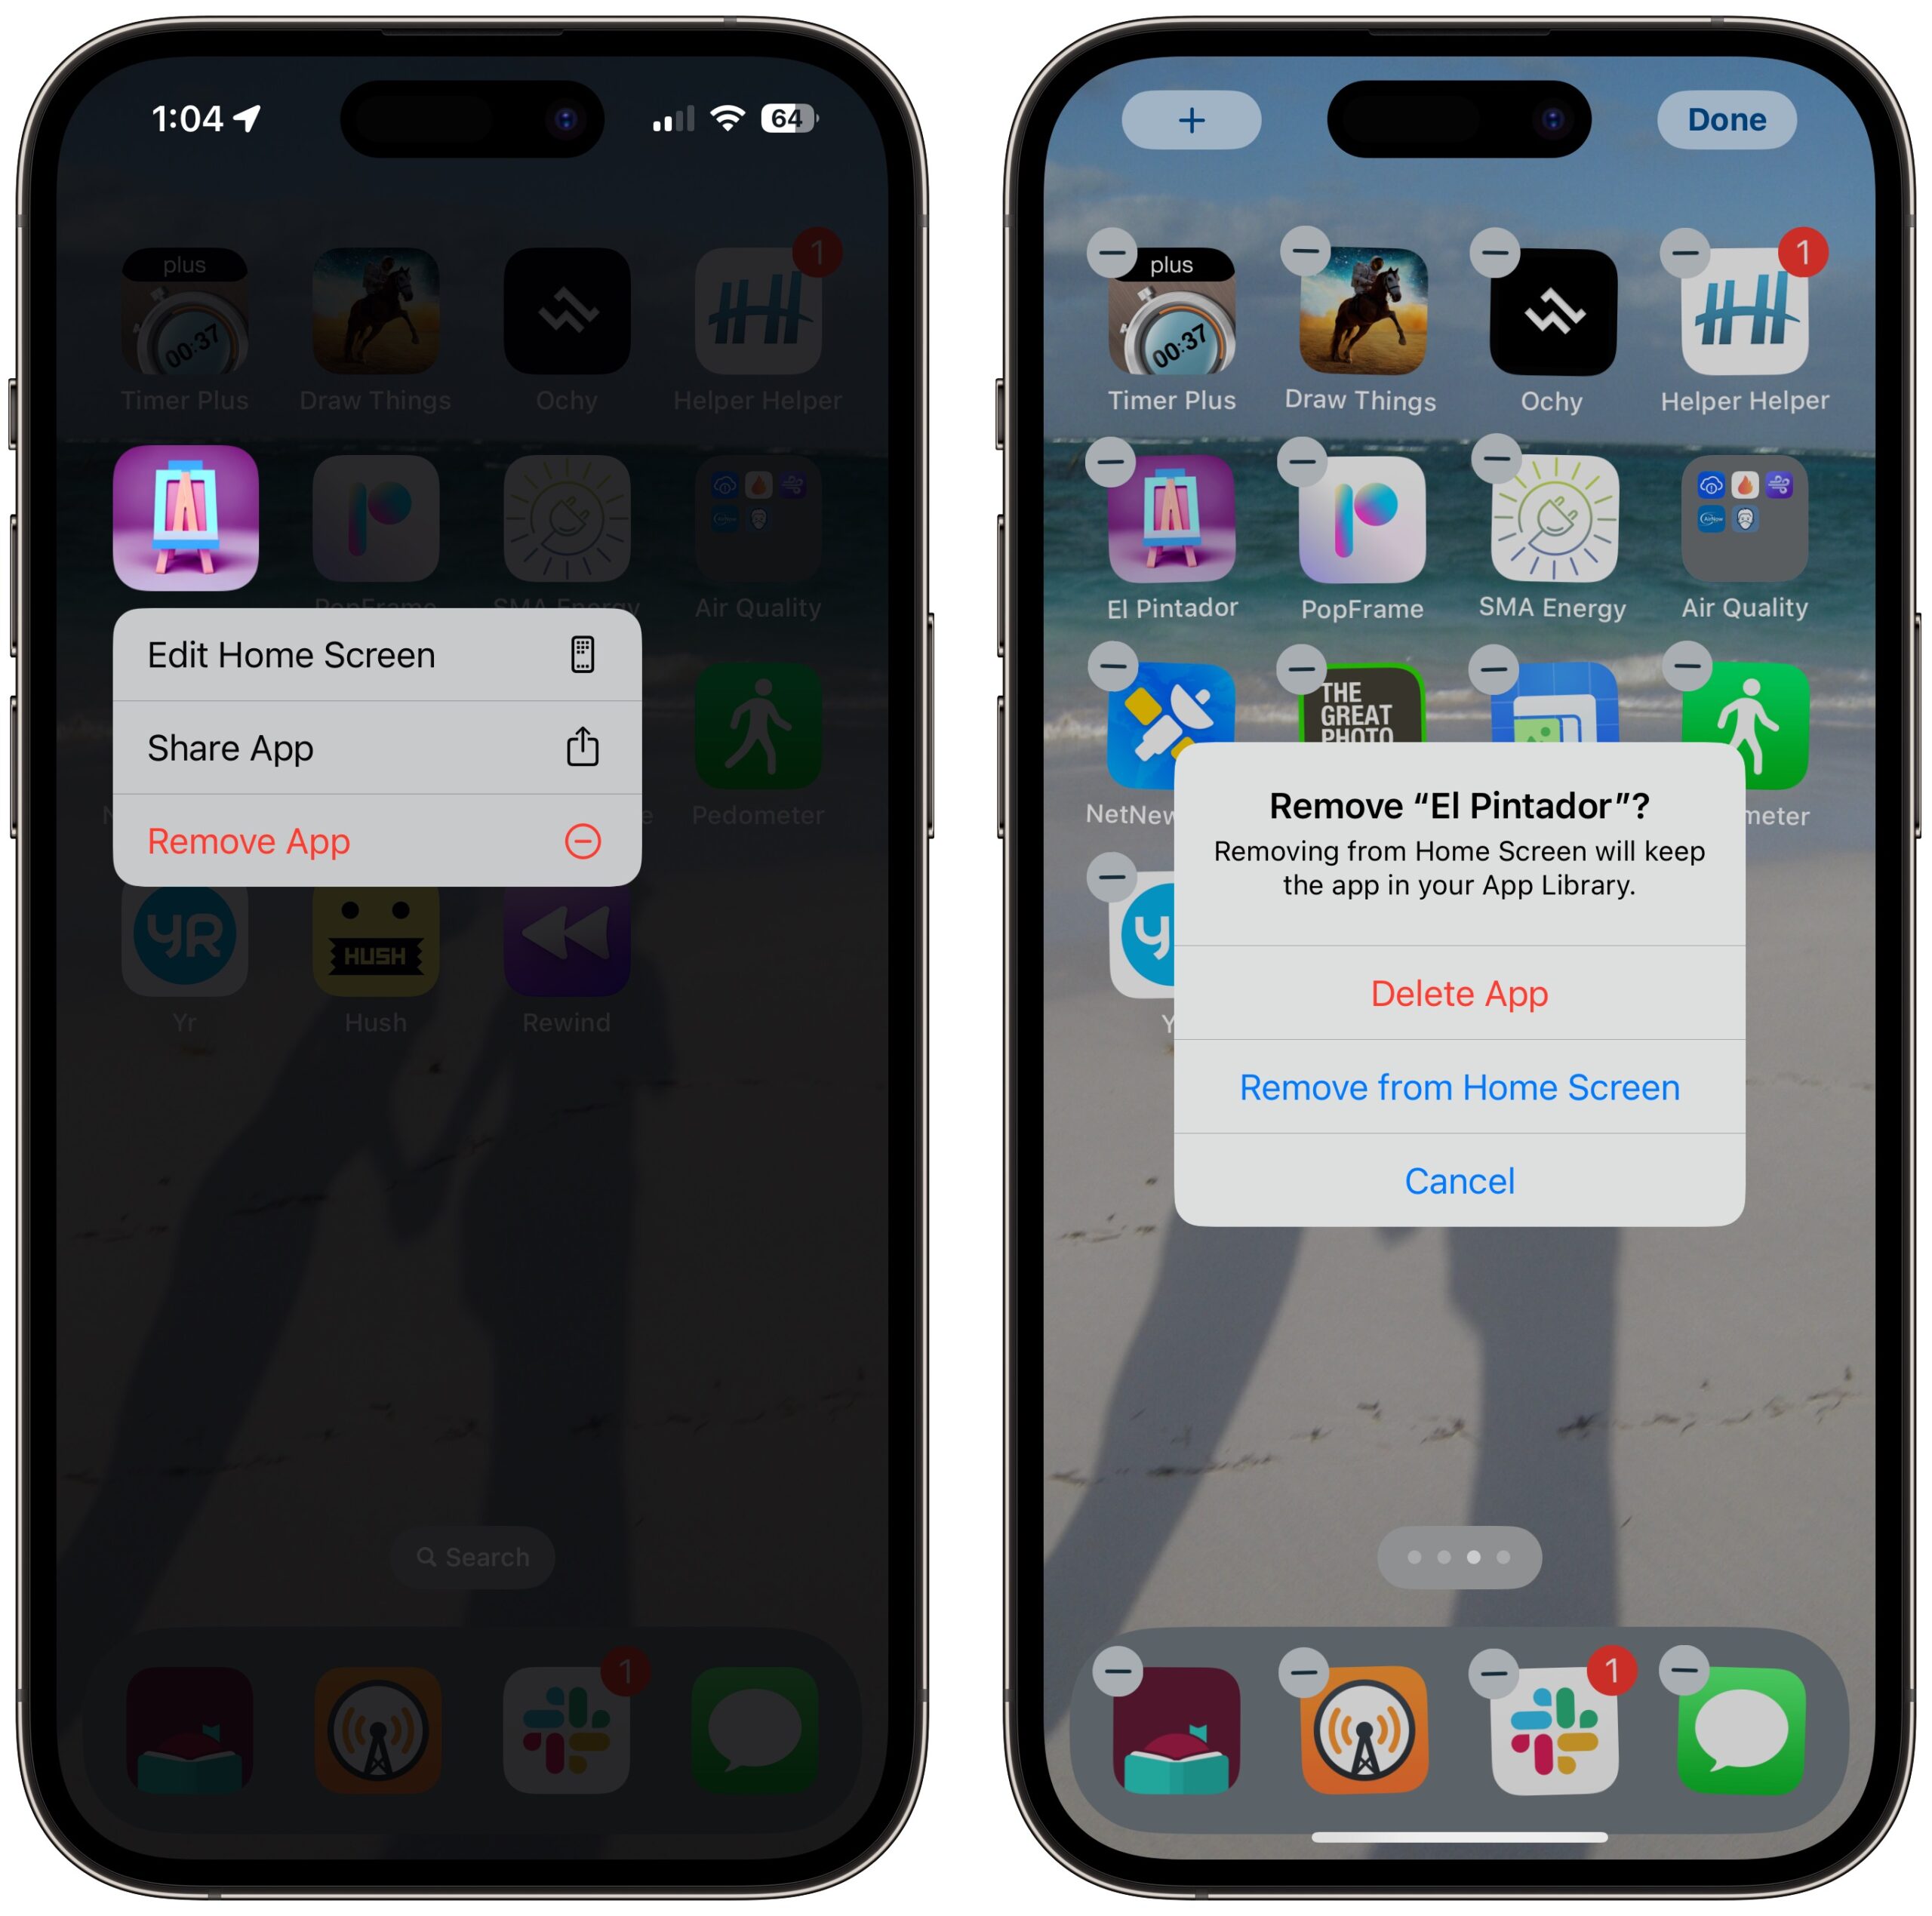
Remove or Delete Unused Apps
Another way to reduce complexity is to arrange the most used apps on the first Home Screen. If you use other apps occasionally, locate them on a second Home Screen. You can demote apps that aren’t being used at all to the App Library or delete them outright.
Touch and hold on any app to bring up a popover with a Remove App option. You can also touch and hold any empty spot on a Home Screen to enter jiggle mode and tap the ⊖ icon to bring up a popover with removal options.
Arrange Apps for Ease of Access
The order in which icons appear on the Home Screen may be important too, whether in order of use, alphabetically by name, or by icon color.
Don’t forget that the most-used apps can, and usually should, appear on the Dock.
To move icons around, touch and hold an empty space on a Home Screen to enter jiggle mode, then drag icons to the desired locations.
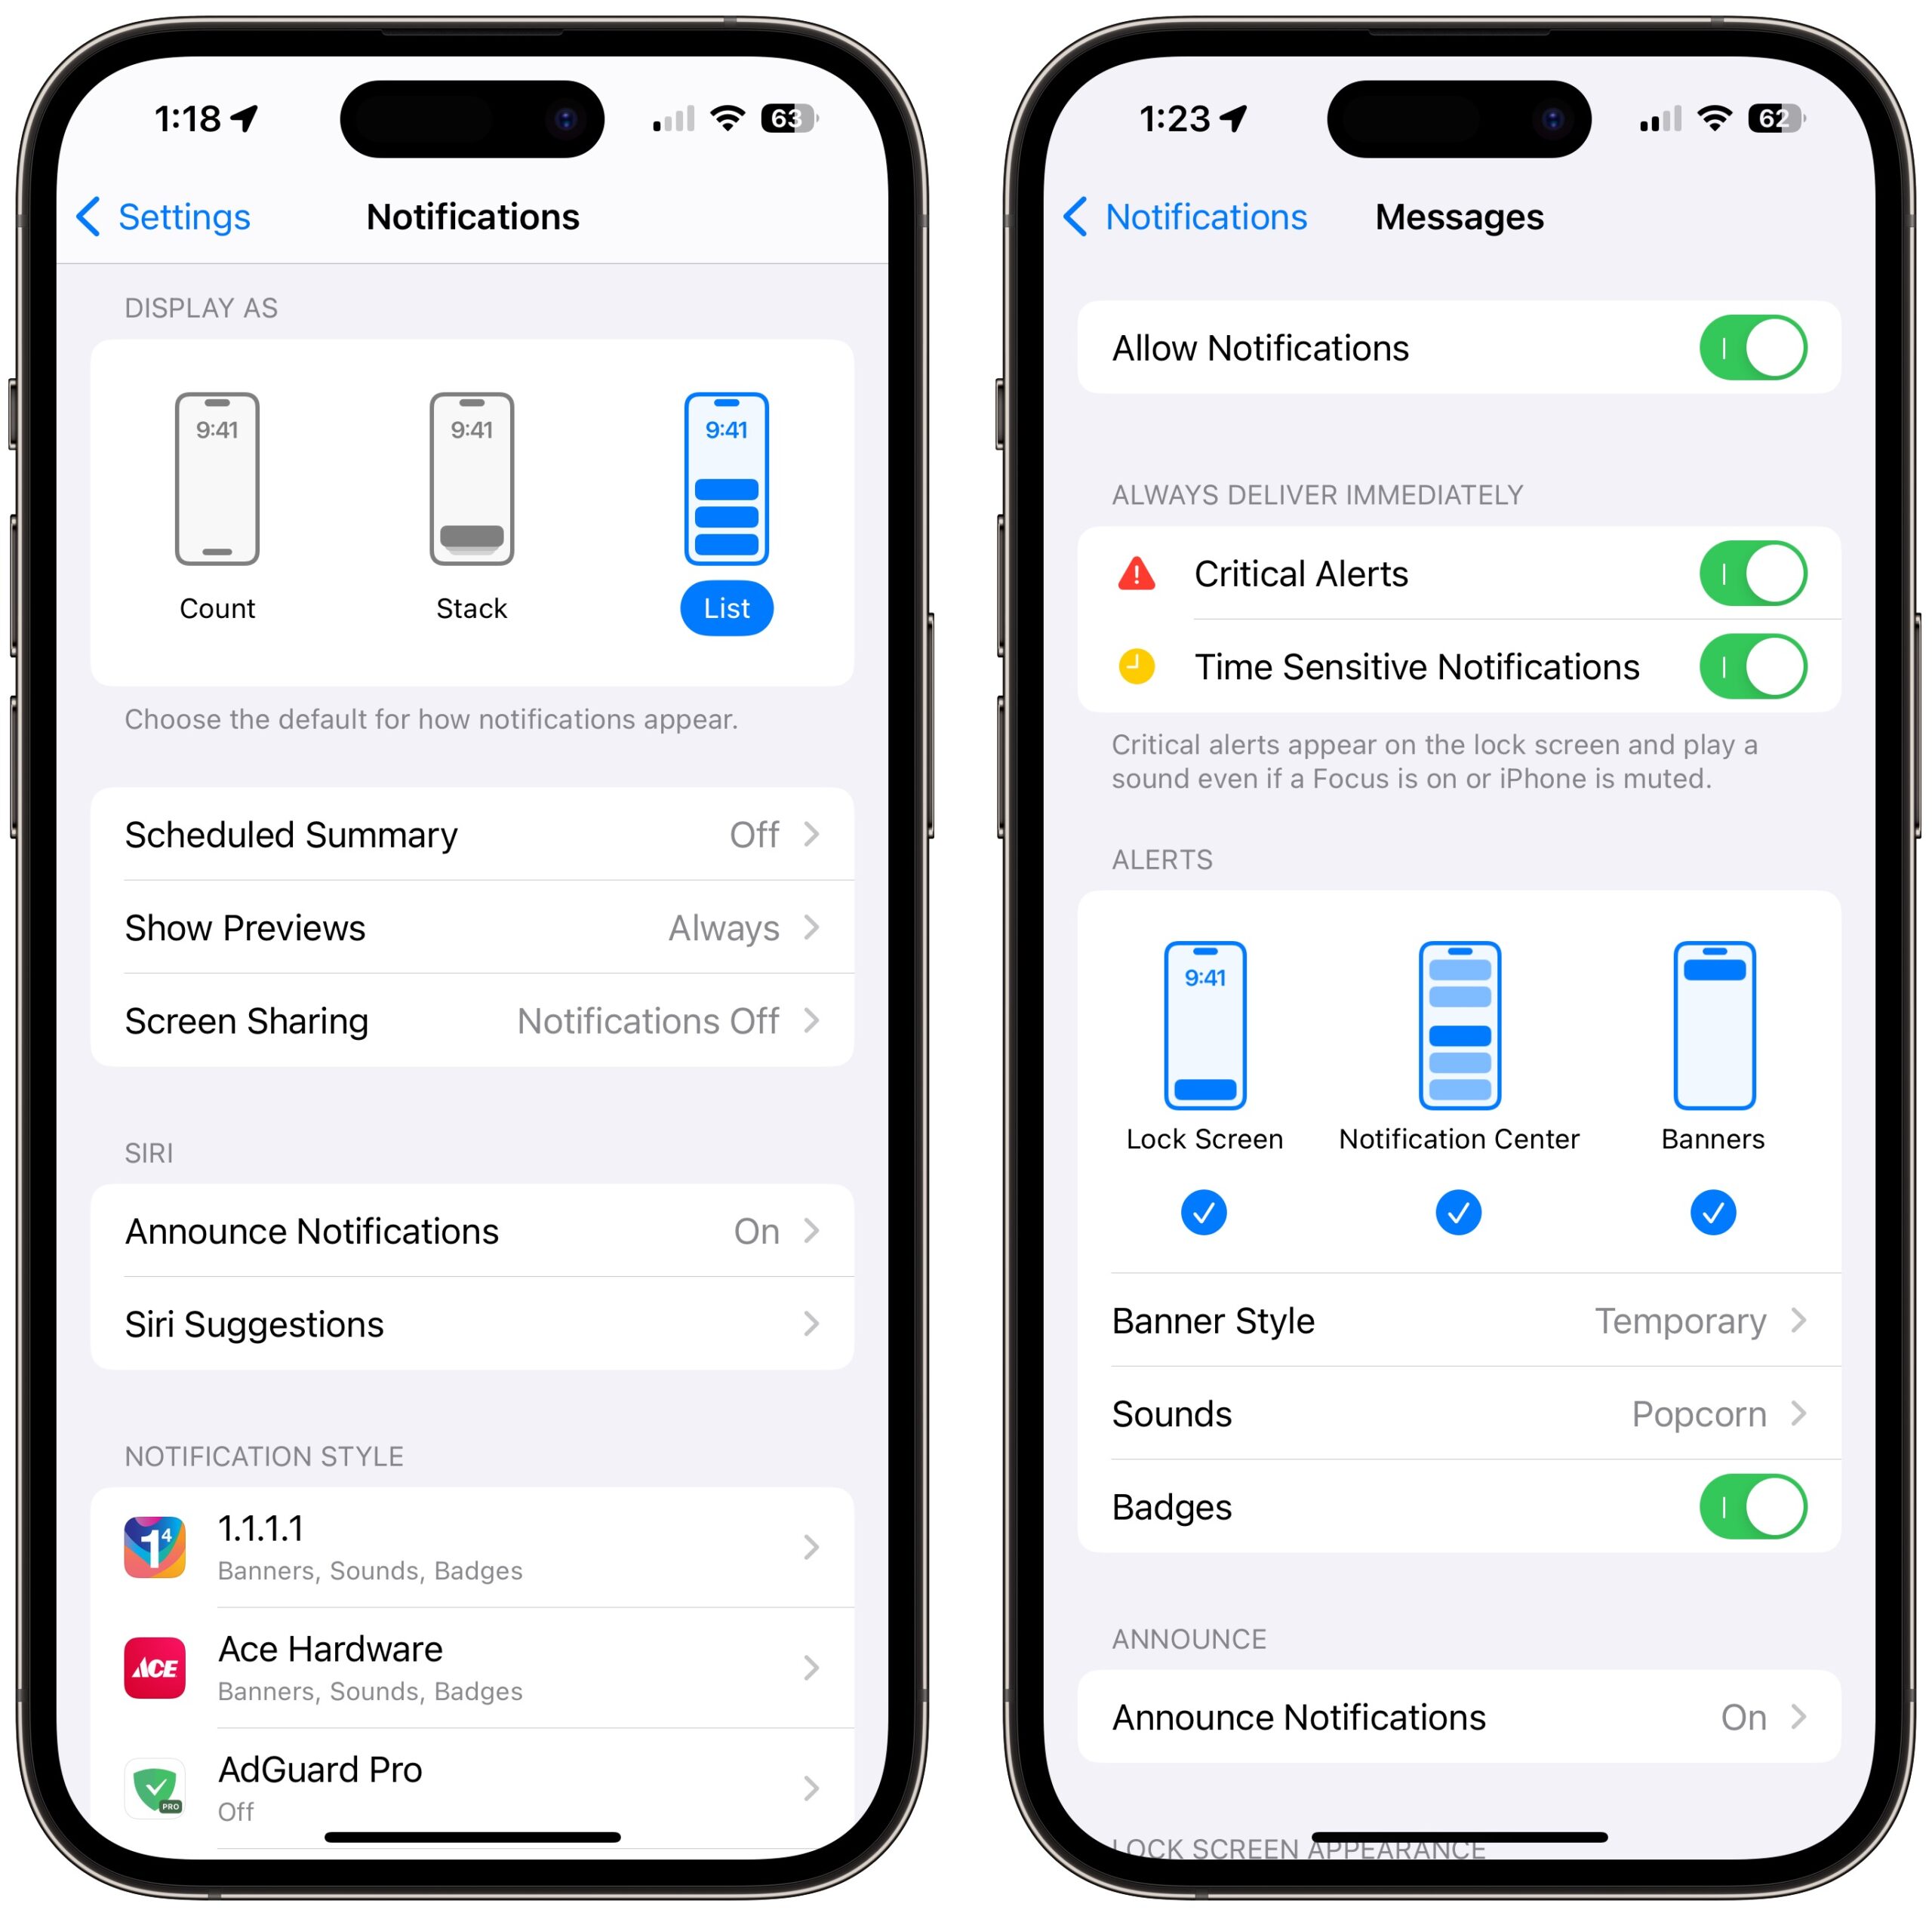
Turn Off All but Essential Notifications
Notifications can also contribute to a feeling of being overwhelmed. Apple provides various ways of managing or reducing notification frequency. These feel to me like they’re designed primarily for busy professionals. For those who just want a less interrupting iPhone experience, I recommend using Settings > Notifications to display notifications as a list. You can turn off Scheduled Summary, and turn on Show Previews (so there’s more context for why a notification appeared). Then, go through the app list and turn off notifications entirely for all but essential apps, like Messages. Obviously, what counts as an essential app will vary so take your time.
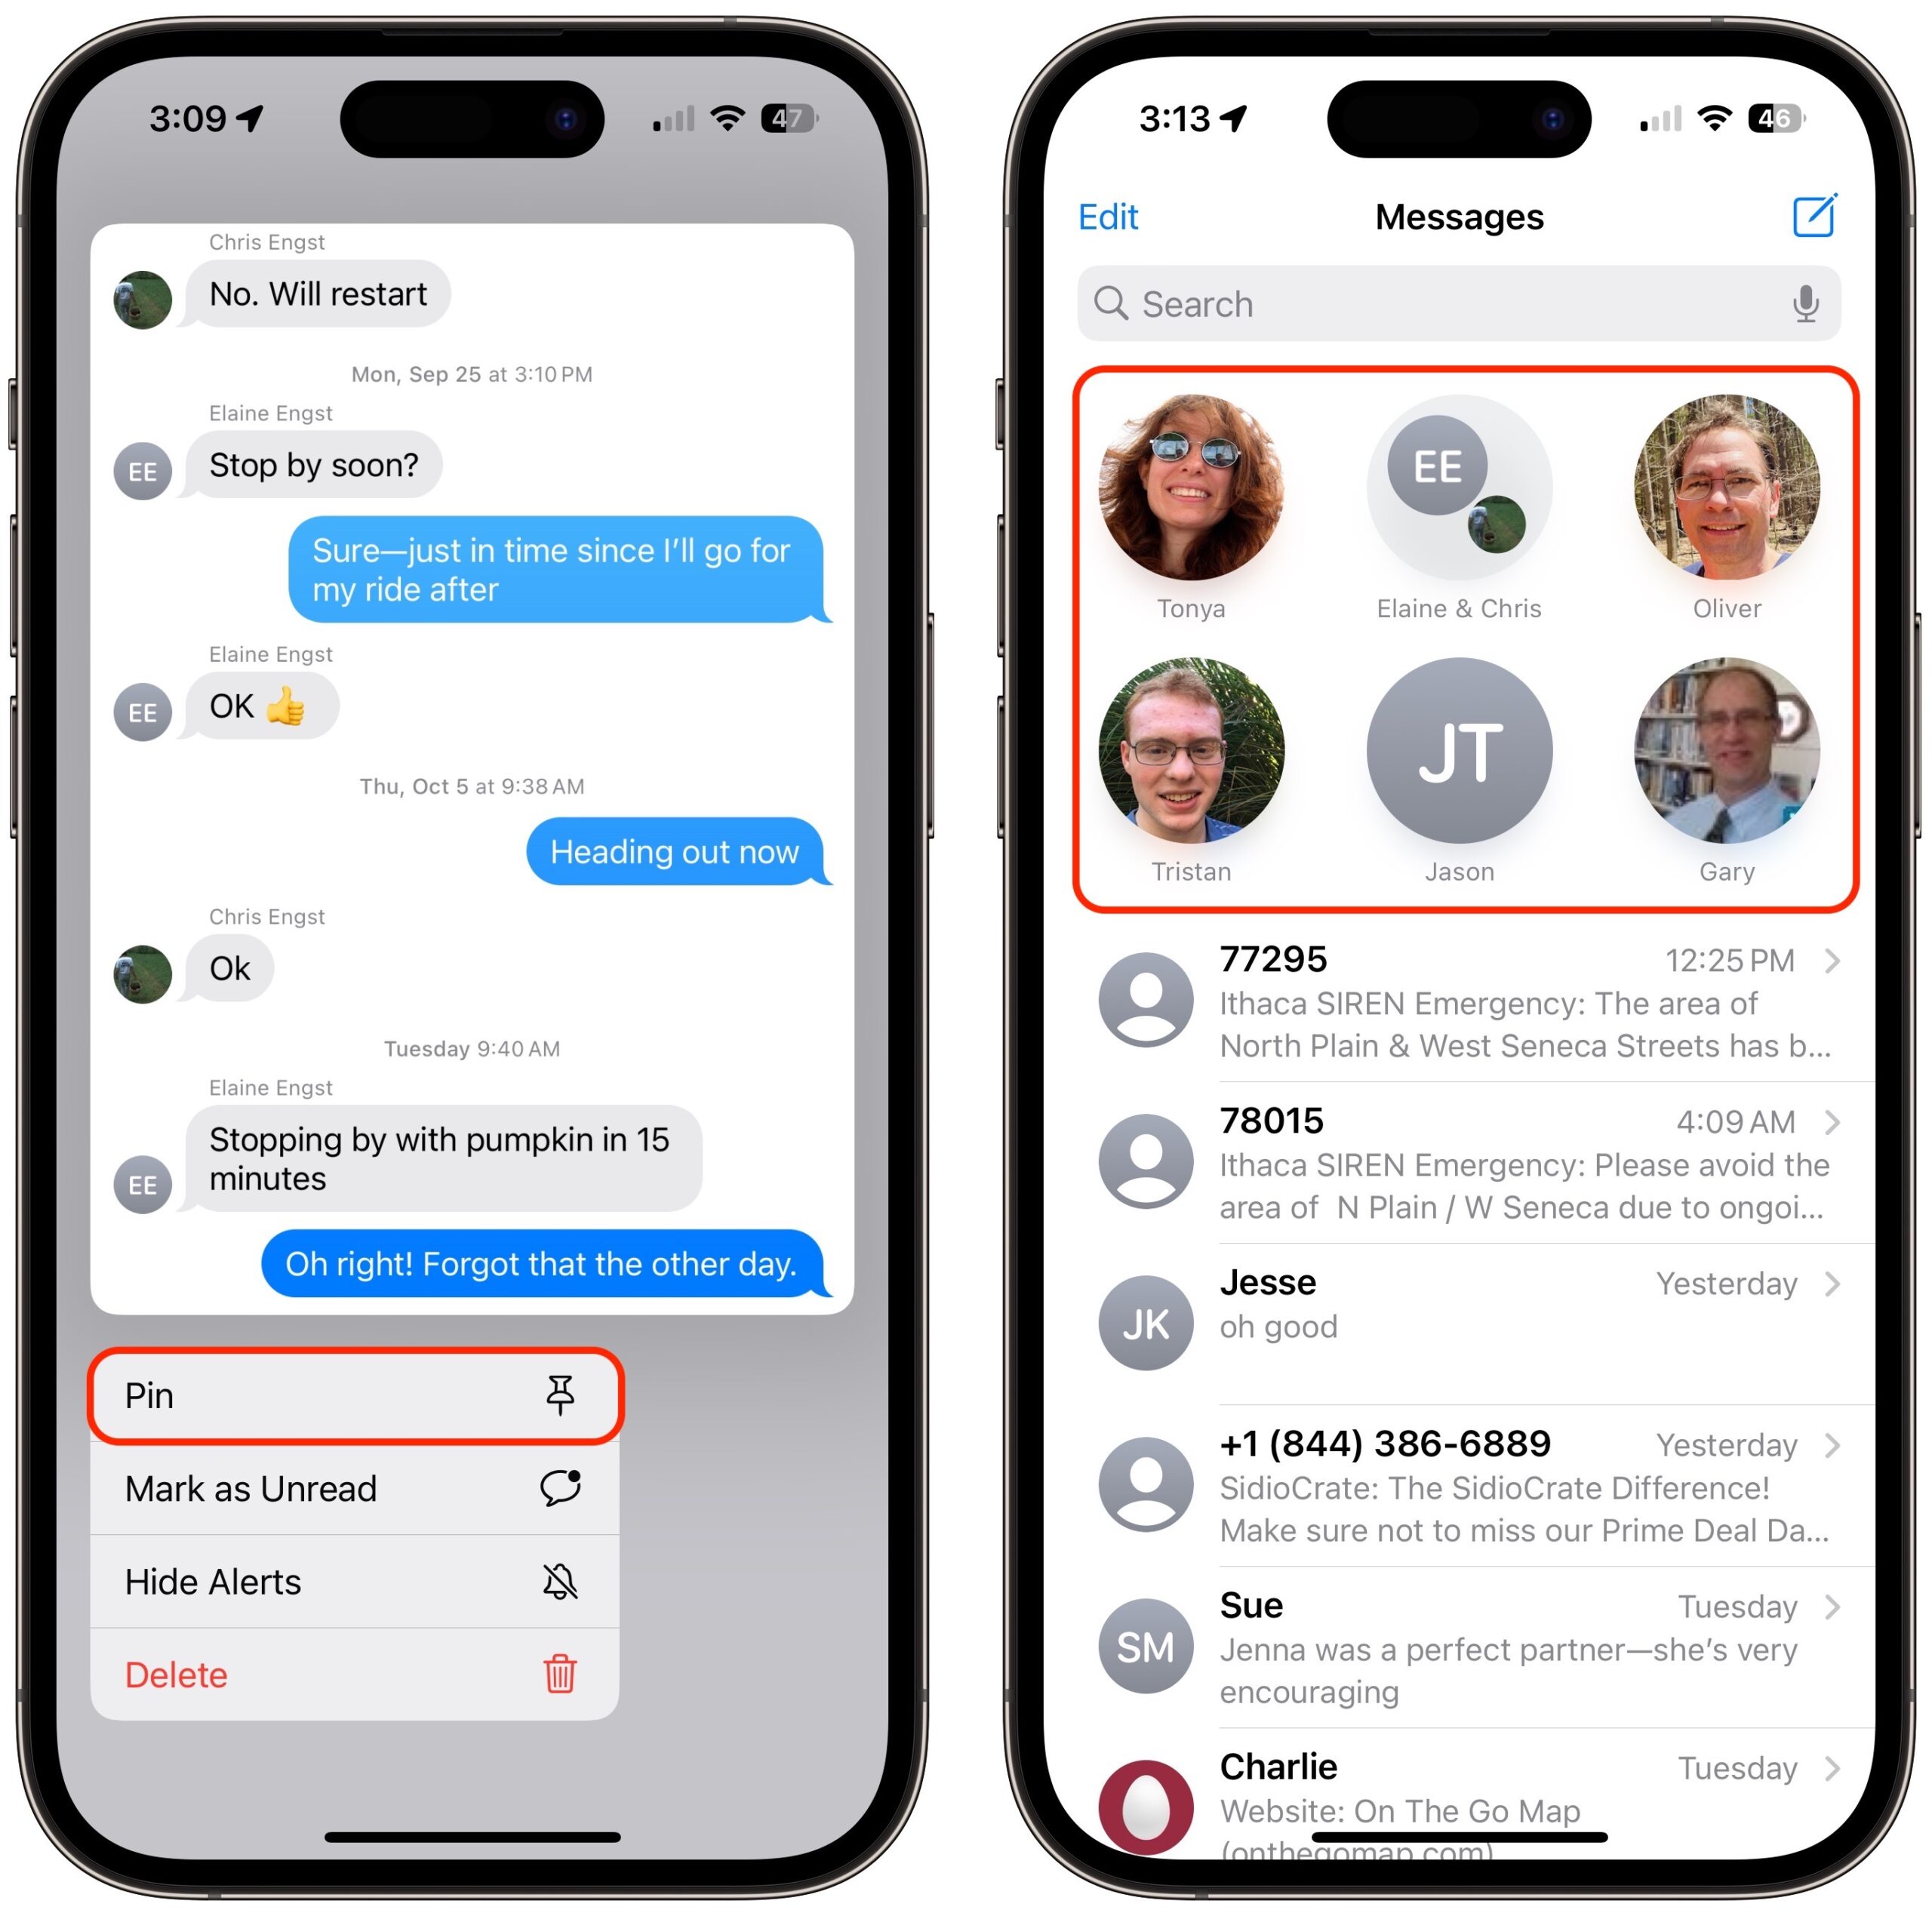
Simplify Access to Frequently Used Conversations and Correspondents
Interfaces are easier to use when their elements are visible and don’t move. You can lock down parts of Messages and Mail.
For Messages touch and hold a conversation and tap Pin in the menu that appears. An icon for the conversation then appears at the top of the list, making it more accessible than having to scroll through any other conversations below. Pins sync across devices linked by iCloud if they also have a Mac or iPad.
Other messaging apps, such as WhatsApp and Facebook Messenger, may have similar options..
Use Dictation or Delegate Text-Intensive Tasks to a Mac or iPad with a Keyboard
Text-intensive activities, such as writing email, are challenging on iPhones for most of us, and that may be even more so for older people dealing with finger dexterity or movement issues. Although learning to tap the microphone button on the keyboard and dictating effectively may be difficult, the desire to communicate may outweigh the difficulty.
Email is the most obvious area, but even Messages may be easier to use on a larger screen and with an external keyboard.
Understand Necessary Communication Compromises
Finally, it may be helpful to discuss new forms of communication.
For instance, if a grandparent wants to communicate with their grandchild, they may have to accept the need for text messages since many students won’t appreciate (or pick up) a phone call and may ignore most emails. Similarly, with communications being much more fluid today, engaging with frequent short messages or calls can be a good way to keep younger relatives from worrying.
Other Recommendations?
Apple has an article that details the exhaustive options available under their Accessibility feature including such areas as: Vision, Mobility, Hearing, Speech and Cognitive:
https://support.apple.com/guide/iphone/get-started-with-accessibility-features-iph3e2e4367/ios
It’s all too much!
That’s why we’re here, to help you every step of the way. Contact Us and we’ll get you set up!
Extracted from a longer article on tidbits.com.